Firebase is an app development platform covering everything from Database, Storage, Authentication to Hosting, Analytics. We don’t need to worry about the back-end of our application. One of the other exciting feature is real-time Database. A change in one client can immediately be seen in another.
If so much of the organisation and architecture is taken care of, than it’s so easy to get started with your interesting idea. So let’s dive in.
Basically we are building a simple todo app. Which will list all the todo, Create new and delete it.
The entire source code is up on github.
Creating a Firebase Project.
- Head over to firebase console.
- Log In if you are not otherwise you will be presented with welcome screen.
- Now click Add Project

- Give name to your project and follow the wizard until you complete all the steps.
Add app to Firebase
- Once our project is created successfully than we need to add APP to our project. It could be Android, IOS, Web or Unity. We need to add a Web app.
- That Could be found on the the dashboard.
- It can also be found on Project Setting as shown in the video below
- At the end of the video I copied the firebase configuration for the later usage.
Adding firebase for angular tools
Let’s create a blank ionic app, followed by adding firebase and @angular/fire package. @angular/fire is official library for firebase and angular It provides all the Observable based features of firebase that are
- Real time updates
- Offline
- Push Notifications and more
    ionic create ionic-ng-tuts
npm install firebase @angular/fire --save
After all of our npm package installed. We need to update update enivronment.ts file with our firebase project configuration. (They can be found on the project setting of project from firebase console).
    export const environment = {
  production: false,
  firebase: {
    apiKey:            "   ",
    authDomain:        "   ",
    databaseURL:       "   ",
    projectId:         "   ",
    storageBucket:     "   ",
    messagingSenderId: "   ",
    appId:             "   "
  }
};
We also need to update the entry module as well.
// app.module.ts
import { AngularFireModule } from "@angular/fire";
import { environment } from 'src/environments/environment';

@NgModule({
  declarations: [AppComponent],
  entryComponents: [],
  imports: [
    BrowserModule, IonicModule.forRoot(), AppRoutingModule,
    AngularFireModule.initializeApp(environment.firebase)
  ],
  providers: [
    // ...
  ],
  bootstrap: [AppComponent]
})
Now as we are done with installation of firebase for angular application. In order to test it, we need some data in our firebase database. Let’s go to the Firebase Console and click on database from menu on the left. Next click on that big button of Create Database.

We can run our app in test mode. (Which means we are running in insecure mode. For long term we need to implement the authentication)
Just go through the wizard. The database is NoSQL so we have files and folder structure. Right now we have no collection in database. Let’s populate it with some data as shown below.
List all the Todo Items using firebase for angular tools
Time for some more coding. Let’s modify home.page.ts
import { Component } from '@angular/core';
import { AngularFirestore } from "@angular/fire/firestore";
import { Observable } from 'rxjs';

@Component({
  selector: 'app-home',
  templateUrl: 'home.page.html',
  styleUrls: ['home.page.scss'],
})
export class HomePage {

  items: Observable<any[]>;

  constructor(private db: AngularFirestore ) {
    this.items = db.collection('items').valueChanges();
  }
}
Line 12 sets items of type Observable Array. Line 15 we are querying collection items which returns an observable.
<ion-content>
   <ion-list>
     <ion-item *ngFor="let item of items | async">
       <ion-label>{{ item.title }}</ion-label>
     </ion-item>
   </ion-list>
 </ion-content>
On line 3 we are using asyncpipe, which will automatically unwrap the observable and automatically unsubscribe to avoid memory leak. The outcome of all this effort becomes
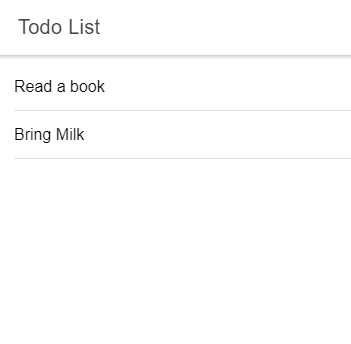
If all goes well, we will end up list of all the todo items in our database. Nothing will show up if there are no items. Adding a new item via firebase is also interesting which is covered next.
Adding New Todo Item
We gonna use a simple form with text input and submit button.
    <form class="ion-padding" (submit)="addTodo()">
    <ion-item>
      <ion-label position="stacked">Add New</ion-label>
      <ion-input name="todo" [(ngModel)]="newTodo" placeholder="todo"></ion-input>
    </ion-item>

    <ion-button type="submit">Add</ion-button>
  </form>
The line 4 uses a variable newTodo for two way data biding. Then we are using the submit event of the form to add new todo item which become clearer when look at the code behind.
    export class HomePage {
  items: Observable;

  newTodo: string = '';
  itemsRef: AngularFirestoreCollection;

  constructor(private db: AngularFirestore ) {
    this.itemsRef = db.collection('items')
    this.items = this.itemsRef.valueChanges();
  }

  addTodo(){
    this.itemsRef.add({
      title: this.newTodo
    }).then(resp => {
      this.itemsRef.doc(resp.id).update({
        id: resp.id
      })
      console.log(resp);
    }).catch(error => {
      console.log(error);
    })
  }
}
On form submission addTodo() function is called. I am using itemsRef class member to refer to the items collection. Most of the magic is happening between line 11 and 13. We are getting the reference of the items collection adding item to it. The line between 17 to 19 is interesting. Firebase generates an unique id when ever a document is created (for future reference). But they are not part of the document. That’s why we have to update the newly create item. Go ahead and try adding you new item to the list.
Related Article.
If you are interested in other awesome Ionic UI components than I recently wrote about a UI Design Challenge
One last thing we gonna cover it to checkoff item from our list.
Removing Existing Item
Let’s modify the item design in a way that we can delete the item. A small trash icon at the end will do the job.
    <ion-item *ngFor="let item of items | async">
      <ion-label>{{ item.title }}</ion-label>
      <ion-button slot="end" fill="clear" color="danger" (click)="remove(item)">
        <ion-icon slot="icon-only" name="trash"></ion-icon>
      </ion-button>
    </ion-item>
We have modified our ion list by introducing the ion-button and a trash icon. Let’s also wrap up the code behind logic of what happens when we click the trash icon.
    remove(item){
    this.itemsRef.doc(item.id).delete()
  }
Remember we are sending the whole item to the remove function. If we recall, we update the item with the id which can be used to delete a particular document. The delete method return the a promise, than and catch much be added so that you don’t get the uncaught promise errors. I have removed them for the sake of brevity.
Result
The entire source code is up on github.
Conclusion
Firebase for angular tools makes it quite easy to create a simple to do app. Especially when with it’s Typescript types and documentation, it usage is quite fun. I hope you have learned enough to create your own app. It doesn’t cover every thing at the moment but we will expand on that example in the future. I have enjoyed writing this article I hope you will enjoy creating you amazing apps by using power of firebase platform. Don’t forget to leave you handy feedback in the comments below.
2 replies on “Getting Started with Firebase for Angular Ionic”
[…] assume you already know how to set up a brand new firebase project. I wrote a nice article about Setting up a project for firebase storage. The article is quite thorough but I have linked to […]
[…] article has a loose dependence on last two articles where I have discussed how to create a simple todo app with firebase and than implement firebase storage. You can read them to know about the journey or continue with […]